Maximus my 07 sequoia
- Thread starter Shaun
- Start date
You are using an out of date browser. It may not display this or other websites correctly.
You should upgrade or use an alternative browser.
You should upgrade or use an alternative browser.


 Well it's in other then needing to swap the bolts for grade 8 and getting washers ( you think they would have been included) and I need to remount one of the light tabs because it's off about a 1/4 " from each other
So just a little FYI for everyone, if you happen to loose your turn signals and backup lights . Look for a fuse in the dash panel labeled gauges , it has nothing to do with gauges it controls your turn signals . Might save you a bit of time trying to trace wires


Finally got around to finishing up my backup lights , was hoping to just run them off my exsisting backup lights but they are a little brighter then I thought they would be so fear of possibly blinding another driver I'm going to put them on a switch . 


Thanks guys , it's getting there . Need to get cracking on the skid plates and rear bumper but life keeps getting in the way lol
Sliders will help, give you something to stand on.View attachment 741 I need to build a kayak rack , getting both up there and secure is not the easiest operation
Coming along nicely, looking good!
It's not so much be able to reach up there it's that the factory roof rack rails are just as wide as the widest ribs on the kayak so once I get them both up there if I push one over an extra inch the other one wants to slide off the top plus I need more tiedown points to get them up there a little more secureSliders will help, give you something to stand on.
Coming along nicely, looking good!
Last edited:
It's not so much be able to reach up there it's that the factory roof rack rails are just as wide as the widest ribs on the kayak so once I get them both up there if I push one over an extra inch the other one wants to slide off the top plus I need more tiedown points to get them up there a little more secure
Loving this build. Saw so many rigs running the ST Maxx 255/80/17 last weekend.
View attachment 741 I need to build a kayak rack , getting both up there and secure is not the easiest operation
So how do you like those amber LED's
I've been looking for another set to replace my current Hellas that I have in the fog light position
So how do you like those amber LED's
I've been looking for another set to replace my current Hellas that I have in the fog light position
To be 100% honest I haven't even hooked them up yet lol I'll get them hooked up this weekend and take a pic
Had to do lower ball joints and axle shafts and am simply amazed at how easy it is , one side took me about 30 min other side took me about 45 min due to a stripped bolt head .
 Start off by pulling your wheel then knocking off this cap
  Straighten out the cotter pin then pull out
  Get out your handy 35mm socket that you just had laying around and didn't have to travel to 3 different part stores to get
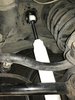
  Pull the cotter pin and nut off the steering . Give the sides of the knuckle a couple good sacks to help loosen things up , mine just came loose sometimes it might require a pickle fork
  next put a jack under the ball joint and jack it up a little to relive the pressure and take off the 4 bolts holding it on should just slide off
  then you just give the axle a good couple of yanks and it should pull right out . Reassemble
Best mod to date , converted the rear shocks from a stem to a regular loop style . When I was flexing the suspension out to measure for shock I had one unhooked on the bottom but when I tried pushing it back onto the axle I physically could not push it over far enough to get it anywhere near the lower mount . That's one reason stem style shocks fail is the amount of stress put on it when the suspension cycles . And now I have a much easier time buying shocks .