2002 Limited 4WD

Sal R.

Very Well-Known Member
Apr 6, 2017
311
177
43
San Diego
So back to the drawing board then... thanks for doing this research. So this is where my incompetence comes in. The Bilstein right now with the 2682 is fully extended as it sits in the parking lot. I do plan on towing a 18' bowrider (4000lb) max with it and hit a few fire roads (sans boat but with some gear in the back). I'm worried that I might get bad results without the ability to cycle the shock a little bit. From what it appears the OME shock 60020L that Josh Embry has or the Bilstein that you recently tested would be the best option as of right now. Does that appear to be correct?

Also! I have my 1530 extrusions in from T-Nutz and the ABS. I just need to get the ABS templated for the riser and cut (going to use my CNC I built) and then load it up. What I like about the larger extrusions is that if I ever wanted to I can take Front Runner accessories and plop them on since their standard is a 8mm bolt for their T-track.

See above.

That is the nice thing about the 15 series. It's more commonly used and beefier, overall. Rhino rack accessories also work, IIRC.
 

mulze42

Known Member
Oct 10, 2017
152
22
18
See above.

That is the nice thing about the 15 series. It's more commonly used and beefier, overall. Rhino rack accessories also work, IIRC.

Great! So your recommendation is the GS59-685 for the LC80 series with 6-7" of lift? I don't think I'll ever have a rear bumper but I think having the boat on there would be reason enough to get those instead of the GS59-575s.
 

Sal R.

Very Well-Known Member
Apr 6, 2017
311
177
43
San Diego
I did a quick flex test at a loading ramp at work and got the following results.

In short, I attained 15" of wheel travel (stuffed to droop) with the new shock and control arm setup. I can achieve another 1-2", maybe more, if I re-adjust the limit straps lower since the coil has room to extend, still. Both measurements were taken thru the centerline of the wheel for consistency.

Sure, I could have crawled under the car and measured shock extension for a more accurate representation of wheel travel, but I like living, most of the time.

All in all, I'm pretty pleased with how this turned out and it was well worth the effort.

Static ride height:
2018-05-04 09_48_04.jpg

Flexed, not stuffed, wheel off the ground, limit strap is taught:
2018-05-04 09_52_59.jpg
 

dstgean

Active Member
Dec 1, 2017
32
3
8
51
Any thoughts of using a pin to shock eye converter to open up the shock selection available? Or are you pleased with the new dobsins? After seeing Josh Embry's video on youtube also linked here on the forum, I might also be inclined to check out the OME line of shocks. I think I may have a bear of a time getting them out as they look a bit old and rusty. That said, I have my 5100's for the front, the 2662's for the rear and now need only shocks to make it bigger--well and tires too.

Dan
 
Last edited:

Sal R.

Very Well-Known Member
Apr 6, 2017
311
177
43
San Diego
Any thoughts of using a pin to shock eye converter to open up the shock selection available? Or are you pleased with the new dobsins? After seeing Josh Embry's video on youtube also linked here on the forum, I might also be inclined to check out the OME line of shocks. I think I may have a bear of a time getting them out as they look a bit old and rusty. That said, I have my 5100's for the front, the 2662's for the rear and now need only shocks to make it bigger--well and tires too.

Dan

I never liked the idea of the eye adaptor since it would constrain the shock movement to one axis as it cycles up and down. With a stem fitment, the shock would be free move about the radius.

It's been a few weeks since I looked at OMEs charts, but I could not find a shock in their catalog that had the right dimensions and was a stem and eye fitment, let alone the appropriate valving.

The Dobinson shocks are en route. Given they are valved to spring rates comparable to OME coils, I think they would serve to be a perfect shock for my setup with carry weight.
 

Sal R.

Very Well-Known Member
Apr 6, 2017
311
177
43
San Diego
MODIFICATION: Radio Stays on During Crank

GOAL:
Keep radio on while cranking car from ACC position.

PURPOSE:
It was ALWAYS annoying hanging out in the car, listening to BT audio, only for the radio to shut off when turning over the car and resetting the connection.

MATERIALS:
2200 uF 35V Capacitor
3A diode

DURATION: 1 hour

COST: $5

HOW-TO:
I knew I needed a capacitor to keep the radio system energized to survive cranking, but didn't know what size I needed or where to best put the capacitor.

A simple search yielded this video:

Resulting schematic:
Capture.PNG

In short, the diode was needed to keep the current from back flowing into the electrical system. Without it, the discharging capacitor did blow the 7.5amp radio fuse. I spliced the capacitor and diode onto the radio harness to keep it simple.

With the 2200 uF capacitor, the radio stays on for 5 seconds when the key is removed before completely discharging.

Plenty of time to turn the car over and keep the radio alive.

Mission accomplished.
 
Last edited:
  • Like
Reactions: paulstoute

Sal R.

Very Well-Known Member
Apr 6, 2017
311
177
43
San Diego
MODIFICATION: Dobinson Rear Shocks

GOAL:
Get the ride under control.

PURPOSE:
Having verified the the shock dims and a better feel for the valving requirements, it was time for the real deal. Considering my rig's carry weight, I opted to go with the LC80 shock. Seemed like a good idea and more cost effective than a custom shock. Not to mention you get a 2.5" smooth body shock cheaper than comprable Icons or Kings.

MATERIALS:
Dobinson Shock G59-685

DURATION: 1 hour

COST: $200

HOW-TO:
Not going to go into the nitty gritty.

The Dobinson shock dropped right in. It had all the required bushing washers for an OE fit and no washers were required for the lower shock eye. It is a complete bolt on modification.

Compared to the 5125, the G59-685 is a little over 0.5" longer, which is a nice pad for LC100 OME rear coil spring users.
2018-05-18 16_43_24.jpg

Full Dobinson rear end:
2018-05-18 17_16_11.jpg

While the 5125s rode like a caddy, it didn't last long w/ the weight of the bumper. 1 hour of highway driving and the shock fades to the point where accelerating will induce understeer when the rear end squats. Similarly, braking induces oversteer making long drives and stop and go a squirrelly experience.

With the Dobinsons under the same condition, there is no fade and all wheels are firmly planted even around corners. Steering control is more controlled. It is stiffer compared to the 5125, but comfortable.

Definitely the right choice for my application.
 
Last edited:

dstgean

Active Member
Dec 1, 2017
32
3
8
51
MODIFICATION: Dobinson Rear Shocks


MATERIALS:
Dobinson Shock G59-685

Compared to the 5125, the G59-685 is a little over 0.5" longer, which is a nice pad for LC100 OME rear coil spring users.
View attachment 1255


Definitely the right choice for my application.

Sal, when I typed in the shock part number, I came up with nothing. I clicked their PDF for the G559-685 and saw the heavy duty twin tube gas shock. Did you order them directly from Dobinson or from a retailer? Last bit of kit before I put on my 5100's and 2662's are my rear shocks. Are your 5100's beat or they just didn't like the weight of the rear end with the bumper and such? Looking to spring for the last bits here before my tires wear out. Similarly how do you like your STT's? Saw some Pirelli's MT Scorpions for by far the cheapest out there. Not much info there however.
 
Last edited:

mulze42

Known Member
Oct 10, 2017
152
22
18
Sal, when I typed in the shock part number, I came up with nothing. I clicked their PDF for the G559-685 and saw the heavy duty twin tube gas shock. Did you order them directly from Dobinson or from a retailer? Last bit of kit before I put on my 5100's and 2662's are my rear shocks. Are your 5100's beat or they just didn't like the weight of the rear end with the bumper and such? Looking to spring for the last bits here before my tires wear out. Similarly how do you like your STT's? Saw some Pirelli's MT Scorpions for by far the cheapest out there. Not much info there however.


Hey dstgean this is what you are looking for GS59-G85 on Amazon https://www.amazon.com/gp/product/B01LXAZ1HN/ref=oh_aui_detailpage_o02_s00?ie=UTF8&psc=1
 

Sal R.

Very Well-Known Member
Apr 6, 2017
311
177
43
San Diego
Sal, when I typed in the shock part number, I came up with nothing. I clicked their PDF for the G559-685 and saw the heavy duty twin tube gas shock. Did you order them directly from Dobinson or from a retailer? Last bit of kit before I put on my 5100's and 2662's are my rear shocks. Are your 5100's beat or they just didn't like the weight of the rear end with the bumper and such? Looking to spring for the last bits here before my tires wear out. Similarly how do you like your STT's? Saw some Pirelli's MT Scorpions for by far the cheapest out there. Not much info there however.

Currently not available, which is not surprising. That's why it's not showing up on Amazon.

There's an organized group buy on the Sequoia off-road Facebook group going on at that moment.

A few people have participated already.

https://m.facebook.com/groups/1517237998306158?view=permalink&id=2092790390750913

My 5100s were completely spent. I could compress the shock with one hand in a kneeling position. It didn't like the weight, for sure. The only thing stopping an underdamped condition was the fact that the shock was too short and limiting spring rebound.

I love the STT Pros. I have no basis of MT comparison since this is my first MT, but considering that I'm on track to get 49k out of these tires speaks volumes. It's more than what I've gotten out of KOs or KO2s.
 
Last edited:

Sal R.

Very Well-Known Member
Apr 6, 2017
311
177
43
San Diego
REPAIR: Remove and Replace Steering Rack

TROUBLESHOOTING:
Other than a leaking guide bushing, the rack was, otherwise, functional. The rack has been leaking for years and it was a super duper slow leak.

Having refreshed the diffs, the rear, and the transmission, it got on my nerves (finally) that this little shit was leaky. Not to mention it was making a mess of my undercarriage.

So, it was time to address this issue.

MATERIALS:
Napa Auto re-manufactured steering rack
1 quart Dextron III automatic transmission fluid
Total Chaos polyurethane steering bushing kit

DURATION: 4 hours

COST: $380

REPAIR:
There's an abundance of YouTube videos on this repair. Can't really remember which one I used, but basically:
  1. Jack up front and remove front tires
  2. Disconnect outer tie rod from lower ball joint
  3. Loosen steering shaft coupler bolt
  4. Remove steering rack bolts
  5. Disconnect hydro feed/return lines from rack
  6. Disconnect hydro feed/return support bracket from rack
  7. Disconnect steering shaft from rack
  8. Remove steering rack
Old vs. New
2018-05-26 13_42_42_1.jpg

About 42k miles ago, I swapped out the crappy rubber bushings with Energy Suspension bushings (pictured black above) and it worked better than OEM for sure.

On this go around, I was advised to use the Total Chaos bushing kit (pictured red above) as it was stiffer compared to the ES set.

Comparing the two, the TC bushings were undeniably stiffer/more rigid than the ES set. The ES set felt like a step above a rubber bushing.

After re-installation and eye-balling my alignment, steering response was dramatically tighter and more responsive. I definitely feel more connected to the road. The drawback is that there is more steering input feedback from the tires. You can feel hints of bumpsteer resulting from road imperfections.

INSTALLATION NOTES:
Because my aftermarket power steering cooler is mounted slightly higher than the reservoir, i had to dismount the cooler and temporarily position it below the reservoir to completely bleed the air out of the lines when refilling the system.

MISCELLANEOUS NOTES:
<~42k miles ago, I installed some Moog inner and outer tierods. When I pulled the rack out and inspected the tierods, they were done. All joints were limp and worn out.
 
Last edited:

mulze42

Known Member
Oct 10, 2017
152
22
18
Oddly enough I was told after my brake replacement disaster that my rack and pinion is offering me a slow leak. Will probably look to replace next time it needs an oil change.
 

Sal R.

Very Well-Known Member
Apr 6, 2017
311
177
43
San Diego
MODIFICATION: Solo Motorsports Mid-Travel Kit, SPC Cams, ICON ET Coilovers, Limit Straps

GOAL:
Improve the IFS system and make it more resistant to key suspension and steering failure.

PURPOSE:
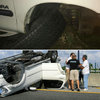
If you hang around the various first gen Sequoia/Tundra/Tacoma and 3rd gen 4Runner forums long enough, you find that the IFS-related components can be pretty scary when the fail. Notice I say "when."

Basically, maintenance is required for components like the lower ball joint, upper ball joint, inner and outer tierods. One cannot afford to ignore these key components.

If any one of the above components fail, you completely lose steering and suspension control. Imagine losing your front suspension or steering while driving 65mph on a highway.
IMG_20180314_104319.jpg

Because this is a single failure prone system, adding some redundancy and strength will go a long ways towards improving reliability.

Having addressed the drivetrain, transmission, steering, differentials and transfer case, the front suspension needed some love.

2018-05-27 16_27_56.jpg

MATERIALS:

Solo Motorsports (SM) custom fabricated spindles
SM lower uniball joint conversion
SM double shear heim steering conversion
SPC alignment cams PN:25445
OEM lower control arms
Pyrotect 6" limit straps with clevis hardware
Icon Extended Travel coilover suspension w/ 700lb springs

DURATION: 8 hours

COST: $3800

HOW-TO:
There's an abundance of YouTube video for replacing the spindles, removing the lower control arms, removing the lower ball joint, etc. I won't go into the details here since there's a lot to cover. I will, however, add my notes and observations on how my installation differed from the what you will find on the net.

Before tearing into the system, preparation is key. Last thing you want is to be dead in the water because of an oops. Because I run a fairly "tucked" wheel spec, I needed to check clearances between the tire and spindle. If I needed spacers, I wanted to know beforehand so I can have it in-hand, in advance.

To do that, I laid my spare face down, placed a rotor in the wheel, and then set the spindle to mock up an installation.
2018-05-27 11_25_39.jpg

All clear. Time to get to work.

Here is my order of operation after vehicle is on jack stands and front wheels removed:
  1. Pop off axle nut cover, remove axle nut
  2. Remove brake caliper from spindle and all associated hardware and lines
  3. Disconnect ABS sensor (there's a connector at the frame)
  4. Unbolt (qty. 4) lower ball joint from spindle
  5. Unbolt upper ball joint
  6. Remove spindle with ABS sensor still installed
  7. Unbolt outer tierod from lower ball joint
  8. Remove inner + out tierod assembly together
  9. Remove alignment cams
  10. Remove lower control arm
All out.
2018-05-28 11_56_30.jpg

Considering I'm tearing down the whole front suspension, I opted to install new alignment cams and new lower control arms. The new lower control arms were a must because 1) my bushings are shot and 2) the control arm lower ball joint mount needed to be modified to accept the uniball, which I explain in detail later.

First, the SPC alignment cams. OEM vs. SPC.
2018-05-28 12_36_12.jpg

The SPC cams uses a delrin sleeve, as opposed to a metal one. Metal sleeves cause a lot of headaches when it seizes due to age, wear, and tear. Sometimes, they had to be cut out. Luckily for me, mine popped right out. Because I was replacing the inner and outer tierods with SM units, I did not have to move the steering rack out of the way to slide out the OEM cams or install the SPC cams. Without the tierods installed, there is no reason to move the steering rack.

After the removal of the OEM cam, I found the the sleeve length was not the "right" length. Both sleeves are the same length, while the cam kit had a long and short cam bolt.

Front sleeve is short:
2018-05-28 12_01_51.jpg

Rear sleeve was too long so I cut it to fit.
2018-05-28 12_01_28.jpg

It fits.
2018-05-28 12_01_18.jpg

I still installed it. Hopefully, it does not pose a problem in the long run.

UPDATE:
Since the install, I have been dealing with some white-knuckle squirrelly steering, tracking, and stability issues. The car was not driveable above 40mph.

After a painful process of elimination, I traced it to the SPC alignment cams.

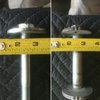
SPC vs OEM Cam Bolt Diameter:
IMG_20180609_173505.jpg

The SPC cams are thinner by 1/4" compared to OEM.

While the included Delrin sleeve makes up that difference inside the control arm bushing, the difference in diameter results in added play in the control arm under load where it mounts to the frame. This added play causes the control arm to shift while on the road and results in my suspension losing its alignment settings.

Fresh wear marks on the cam side and in the bushing side corroborated my theory.

Re-installing the OEM cams resolved the unstable steering issues completely.
 
Last edited: